Folks I am proud to report that we made our December 1st deadline for getting all our Christmas gift shopping/making done. It was quite the undertaking with all the handmade gifts I did this year, but oh so worth it. Already December has been more relaxed and we are just able to enjoy our time together as a family. There are of course still the wrapping of presents and all that fun, but the rest is done. It feels so good! I think we'll do this every year. Seriously.
And now I actually have time to blog about the stuff I've made! Yeah!
Wednesday, December 5, 2012

A little man's tool belt
This has truly turned into the year of the handmade Christmas! I was going through the list of things we have to put under our tree and a good portion of them are handmade. One of the few store bought items my boys are getting this Christmas is a tool bench with a tool set (yes they will be in heaven on Christmas morning). I thought it would be fun to make them each a tool belt to go along with their tools. But I didn't want to spend any money on it so I was relegated to using things I could find on hand. I mulled over some different ideas, but decided on this tutorial that repurposes old jeans into a kids tool belt (awesome right?!). Well after my fiasco with the car cozy I made using an old pair of jeans I just couldn't bring myself to give denim another try (I'm a chicken I know). Instead I used some left over red upholstery weight fabric I had on hand (canvas maybe? I'm not sure) along with some coordinating cotton plaid scraps for the edges.

I'm generally please with how they turned out though they are still lacking a little something to me. If I had to do it over I would have used a contrasting thread on the pockets so you could see them better. Live and learn!

I'm generally please with how they turned out though they are still lacking a little something to me. If I had to do it over I would have used a contrasting thread on the pockets so you could see them better. Live and learn!

I even managed to score the parachute buckles for free. I had an old backpack with all kinds of buckles and straps on it that was just gathering dust and headed for Goodwill. I also noticed that the Dollar Tree has dog collars with parachute buckles that would probably also be a great alternative. If I hadn't had something on hand I definitely would have gone that route.

I think I might go back after Christmas and add a little something more to these (a felt monogram with their first initial, some loops for hammers...I'm open to ideas). There is just something missing.
But I am determined not to do anything else to them before Christmas!
(I’m sharing this at the Dare to DIY party hosted by Decor and the Dog, Maybe Matilda, Newly Woodwards, and Two Twenty One!)
But I am determined not to do anything else to them before Christmas!
(I’m sharing this at the Dare to DIY party hosted by Decor and the Dog, Maybe Matilda, Newly Woodwards, and Two Twenty One!)
My version of the adorable monster coloring tote
POST EDIT: If you are visiting from Pinterest, welcome! I'm excited to announce that I have opened an etsy shop to sell these cute bags. You can find my shop here.
On my list of things to make for my kiddos this year was some kind of crayon cozy. When I came across this adorable tutorial for a monster tote (seriously, check it out) I decided to take the plunge even though it wasn't what I had originally envisioned. Some where in my google searching I came across this blog as well and I sort of combined ideas from both of them to make these sweet things!
(forgive the less than stellar photography)


I am so happy with how they turned out. I was also impressed with how easily they came together (especially the second one!). I deviated a bit from the original tutorial (they are sized a little differently, I changed the bottom of the bag a bit, and used only felt etc.). Oh and instead of using nylon webbing for the handles I just did a double layer of felt for each handle. Saved me a couple bucks and a trip to the fabric store. Winner in my book!

They are the perfect size for a coloring book and a few other toys/books. Love it!

(I’m sharing this at the Dare to DIY party hosted by Decor and the Dog, Maybe Matilda, Newly Woodwards, and Two Twenty One!)
On my list of things to make for my kiddos this year was some kind of crayon cozy. When I came across this adorable tutorial for a monster tote (seriously, check it out) I decided to take the plunge even though it wasn't what I had originally envisioned. Some where in my google searching I came across this blog as well and I sort of combined ideas from both of them to make these sweet things!
(forgive the less than stellar photography)


I am so happy with how they turned out. I was also impressed with how easily they came together (especially the second one!). I deviated a bit from the original tutorial (they are sized a little differently, I changed the bottom of the bag a bit, and used only felt etc.). Oh and instead of using nylon webbing for the handles I just did a double layer of felt for each handle. Saved me a couple bucks and a trip to the fabric store. Winner in my book!

They are the perfect size for a coloring book and a few other toys/books. Love it!

(I’m sharing this at the Dare to DIY party hosted by Decor and the Dog, Maybe Matilda, Newly Woodwards, and Two Twenty One!)
Monday, November 12, 2012
Portable Felt Car Mat/Car cozy
Friends, I have been hard at work this last week and I am ridiculously excited to share what I've been working on. Christmas is fast approaching and we are trying something new this year. In an effort to enjoy the holiday season more we are determined to be entirely done with our Christmas shopping/gift making by December 1st. We've decided whatever isn't done by the 1st isn't going to happen. We might be a little crazy, but I'm excited to see how this grand experiment goes.
With a December 1st deadline it is major crunch time around here! Last week I hit the DIY Christmas projects hard spending pretty much every free moment making Christmas gifts for my boys. First on the list for them was a car cozy to house the matchbox cars we got them for Christmas.
This sweet little car cozy by Homemade by Jill seemed perfect and I actually made one a few weeks ago.

{Click on the picture to go to her fabulous tutorial and generally fabulous blog}
Instead of doing a simple applique on the front I hot glued a whole street system with a few buildings on it which turned out cute! But I just wasn't thrilled with it. The denim+canvas made for a really bulky combination that for me, a very average seamstress, was hard to sew. I found myself not looking forward to making a second one (with twins we do everything by twos in this household) and it kept getting bumped to the bottom of my list.
So I decided to hit the internet up for some more inspiration and I came across this
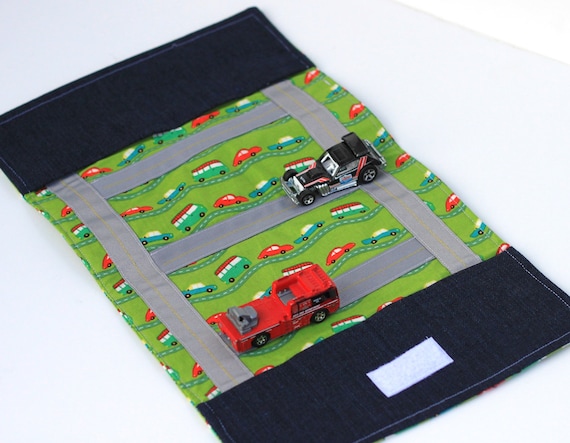
{Click on the picture for a link to her etsy shop where you can buy the pattern or the mat itself}
I loved that it folded up and seemed so much less bulky! But I wanted a road system that was a little more fun/intricate. Armed with some new inspiration I set out to make my own version of the car cozy that would have everything I wanted. They are far from perfect, but I am so thrilled with how they turned out!
(Prepare yourself for picture overload)
Portable felt car mat #1
Side One: I decided to do a race track on one side along with the pockets that hold the cars.

I wanted to spice it up a little bit so I put colored parking spaces in the middle of the race track. I figure it's good practice for the boys to work on their colors ("put a car on the green spot." etc) plus it added some visual interest (the white strip is velcro).

I did a simple stitch and added numbers to each pocket. Again, great practice/exposure to print and numbers.

Side 2: The street view! I was really excited about this part of the project, though it required me to learn some new stitching skills which I am clearly still working on perfecting. I wanted to include some places that we go regularly like the grocery store, library, and park. Well ok we don't go to the park regularly, but I know my kids would love it if we did. A long time ago I saw an adorable felt car mat that had a car wash like the one I included. I wish I knew where I saw it so I could give proper credit. I think the car wash might be one of my favorite parts of this mat!

{Clockwise: Grocery store, library, fire station, car wash, park, pond with tree, house.}


Car Mat #2
So because we have twin boys we do everything by twos. I was nervous as I started this project that I would be burned out by the time it came to start the second car mat. Thankfully I wasn't and I think this one turned out even cuter than the first!
Side one: I did the same thing as the first mat, with different colors (the background color is light blue not the white it appears to be).


Side Two: I had a little more confidence in my skills as I started the second mat so I got a little more creative in some of the buildings I included and I love how it turned out!

{Clockwise: Gigi's cupcakes (the boys love this place!), house, townhouse, Lowe's (another favorite place), gas station and hospital}
My two favorite parts of this mat are the gas station with the shoe lace pump.


And the Gigi's Cupcakes which just turned out adorable!


AND
(are you ready for this???)
I made the mats so the roads would intersect (more or less) when placed next to each other. So they combine to make a bigger car mat that the boys can share (wishful thinking?).

{Car mat #2 on the left and #1 on the right}

{Car mat #1 on the left and #2 on the right}
I'll have to add a picture of how they fold up, but this is what they look like when they are folded up. They are secured with a velcro closure with the cars inside.

{Car mat #1 folded up, front}

{Car mat #1 folded up, back}
I am beyond thrilled with how these turned out and while I sewed everything on it would be really simple (and much faster) to make a mat using mostly hot glue.
I just hope my boys love them as much as I do!
(I’m sharing this at the Dare to DIY party hosted by Decor and the Dog, Maybe Matilda, Newly Woodwards, and Two Twenty One!)
Sunday, September 9, 2012
Christmas 2012: Stroller makeover!
I'm making a concerted effort to be more organized with our Christmas plans this year. At the top of this list has been getting a head start on Christmas presents. I've found thus far that if you start early you can get the things you want at the best price (and sometimes super cheap!) allowing you to either get more than you planned for the ones you love or put that money towards something else altogether (student loans, anyone?)
One of the things on my Christmas list for my boys was a doll stroller.
(Yes we are the kind of parents that buy doll strollers for their all boy brood).
We picked up this little beauty at a garage sale for 50 cents (saweet!).

One of the straps was only attached by a thread which was going to be an easy enough fix so I went ahead and...
recovered the whole thing and spray painted it to match the new cover.
Gotcha! You thought I was going to say I fixed the strap and called it good. Yeah, well I thought that was what I was going to do as well, but then the wheels started turning...
I decided I wanted something slightly more masculine than purple and pink and ballet shoes BUT I didn't want to spend a dime more than the whopping 50 cents I'd already shelled out so whatever I did needed to be using stuff I already had on hand.
And here's how it turned out:
One of the things on my Christmas list for my boys was a doll stroller.
(Yes we are the kind of parents that buy doll strollers for their all boy brood).
We picked up this little beauty at a garage sale for 50 cents (saweet!).

One of the straps was only attached by a thread which was going to be an easy enough fix so I went ahead and...
recovered the whole thing and spray painted it to match the new cover.
Gotcha! You thought I was going to say I fixed the strap and called it good. Yeah, well I thought that was what I was going to do as well, but then the wheels started turning...
I decided I wanted something slightly more masculine than purple and pink and ballet shoes BUT I didn't want to spend a dime more than the whopping 50 cents I'd already shelled out so whatever I did needed to be using stuff I already had on hand.
And here's how it turned out:
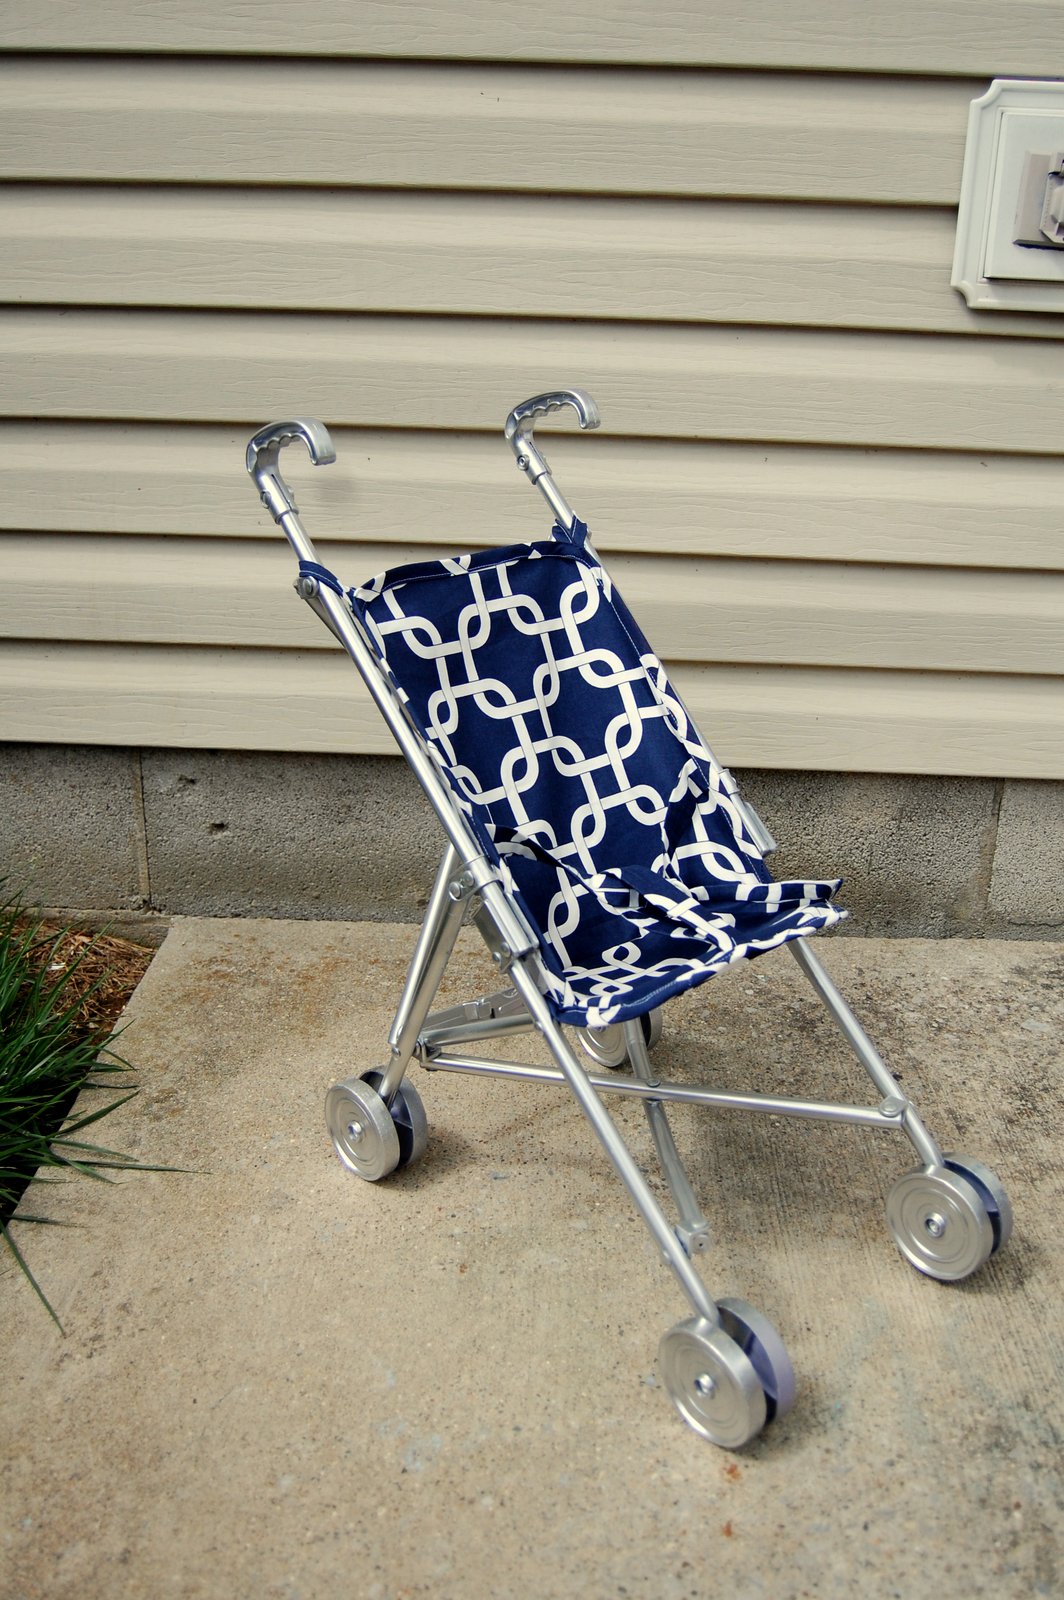
Cute, huh? I used some fabric I had on hand to make the cover. I just used the old cover as a pattern, paying close attention, as I dismantled it, to how it was put together. I even made my own bias tape to go around the edges.
(Note: no matter what all those bias tape tutorials tell you [i.e. how it's so easy to make!] just know that making bias tape is not for the faint of heart or the impatient or sleep deprived. I'm glad I did, but boy howdy does it exercise those brain cells.)
Ideally, I would have spray painted the frame white with blue wheels and handles. However, I didn't have any white paint on hand and the goal was not to spend another penny on this project.
All in all I think it turned out pretty awesome!


Wednesday, May 9, 2012
Chick-fil-A Cow repurpose
The last few months have been kind of crazy (hence the absence of posting here). Mostly its just been dealing with sick kids: colds, hand-foot-mouth (which I also had the pleasure of getting), and most recently a nearly week long bout with a stomach bug. I'm hoping that with the warmer weather here we'll experience less sick days and more fun.
Playing both mommy and nurse to my twinners hasn't left much time to get any projects done. I've been itching to do something creative lately, but I knew it had to be simple and quick. Enter the ugly Chick-fil-a cows. This is possibly the lamest craft project ever, but it was fun.
So we got 2 little free Chick-fil-a cows at a 5k I ran a few months back. I held on to them even though I'm not a super fan of toys that double as free advertising. I was on the verge of just tossing them, but I thought I might be able to salvage them by removing the sign. No go. The front sign came off, but the back sign wasn't removable.

So instead I decided to turn them into super hero cows. It was super simple to do with a little hot glue and left over felt from another project. They are now sporting the boys' initial on the front and I turned the sign in the back into a cape.
super.simple.
super.cows.

Playing both mommy and nurse to my twinners hasn't left much time to get any projects done. I've been itching to do something creative lately, but I knew it had to be simple and quick. Enter the ugly Chick-fil-a cows. This is possibly the lamest craft project ever, but it was fun.
So we got 2 little free Chick-fil-a cows at a 5k I ran a few months back. I held on to them even though I'm not a super fan of toys that double as free advertising. I was on the verge of just tossing them, but I thought I might be able to salvage them by removing the sign. No go. The front sign came off, but the back sign wasn't removable.

So instead I decided to turn them into super hero cows. It was super simple to do with a little hot glue and left over felt from another project. They are now sporting the boys' initial on the front and I turned the sign in the back into a cape.
super.simple.
super.cows.


Tuesday, March 13, 2012
Daddy-Baby hand print art
Well I've taken a bit of hiatus from this blog as of late due to illness and teething and two cranky babies. I'm hoping the worst is behind us for this cold/flu season (crossing my fingers!). I am happy to say that I've still managed to get a project or two done over the last month. Yeah! So more to come on those a bit later. The project I'm sharing today was a Christmas present for my husband (but it would make a great father's day present!). Inspired by this on pinterest I decided to try a DIY version.

Source: Pinterest
I really wanted these to be a surprise so I blindfolded my husband one evening after the kids were in bed and stuck his hands in acrylic paint and put his hand print on two 8x10 white canvases. The blindfolded part was a little tricky, but his hand print turned out pretty well.
I let the canvases dry overnight and then did our twins hand prints the next day. I first tried doing their hand prints in white like the original, but you couldn't really see them (I think because the canvas was white as well). The beauty of using canvas is I could wipe off the white prints without really damaging my husband prints. Sweet!
(If I had to do it over I'd paint the canvas a darker shade of the hand print color first, then do the adult print then the baby print in white. I think that would work.)
So I tried again with my twins, this time using a darker hue of my husbands print color. This worked great on the blue and not as great on the green (I think the green wasn't light enough to begin with, live and learn)
With two wiggly one year olds it took me several tries to get a decent print (having another adult help would've been invaluable!). Again, canvas saved me because I could just wipe off the bad print while it was still wet and try again.
I wasn't thrilled with how the green one turned out, but it was too close to Christmas to redo it so I wrapped them up as-is (er, as-was) and figured I could redo it with some help from the hubby.

Well my husband loved them and insisted he didn't want to redo the green one. So I added the text (sketched out in pencil first and then painted over the pencil marks) and sent him off with some new art for his office.
They didn't turn out perfectly, but I love them!
Subscribe to:
Posts (Atom)
